Are you ready to whip up a dessert that’s both simple and delightful? Mini Cheesecake Bites are the perfect treat for any occasion. With their creamy texture and endless topping options, these bites will impress your friends and family. I’ll guide you through each step, from choosing ingredients to baking and storing. Let’s dive into this easy recipe that brings all the joy of cheesecake in a fun, bite-sized form!
Why I Love This Recipe
- Deliciously Rich: These mini cheesecake bites pack a creamy, rich flavor that satisfies any sweet tooth.
- Perfect for Any Occasion: Whether it's a party, potluck, or just a cozy night in, these bites are a hit with everyone.
- Customizable Toppings: Top with fresh fruits, chocolate, or caramel to create your perfect dessert.
- Easy to Make: With simple ingredients and straightforward steps, even beginners can whip these up!
Ingredients
Complete Ingredient List
To make Mini Cheesecake Bites, gather these items:
- 1 cup graham cracker crumbs
- 1/4 cup unsalted butter, melted
- 2 tablespoons sugar
- 2 (8 oz) packages cream cheese, softened
- 1/2 cup powdered sugar
- 1 teaspoon vanilla extract
- 2 large eggs
- 1 cup fresh raspberries (or your choice of fruit topping)
- Whipped cream for garnish (optional)
These ingredients create a creamy cheesecake with a crunchy crust.
Substitutions for Common Ingredients
If you need alternatives, here are some easy swaps:
- Graham cracker crumbs: Use crushed cookies or digestive biscuits.
- Unsalted butter: Margarine works well.
- Cream cheese: Neufchâtel cheese is a lower-fat option.
- Powdered sugar: Regular sugar blended finely can work too.
- Fresh raspberries: Try strawberries, blueberries, or even cherries.
- Whipped cream: Use whipped coconut cream for a dairy-free option.
These substitutions help you adjust based on what you have at home.
Recommended Toppings and Garnishes
To make your Mini Cheesecake Bites even better, consider these toppings:
- Fresh fruit like strawberries or blueberries
- Drizzle of chocolate sauce or caramel
- A sprinkle of crushed nuts for crunch
- A dusting of cocoa powder for a rich taste
- Shaved chocolate for a fancy look
These toppings add flavor and make your bites look stunning!

Step-by-Step Instructions
Prepping the Muffin Tin
To start, preheat your oven to 325°F (165°C). This warm-up helps the cheesecakes cook well. Next, grab a mini muffin tin. Line it with mini cupcake liners. This makes it easy to remove the bites later. A well-prepped tin sets the stage for your treats.
Making the Crust
In a medium bowl, mix together 1 cup of graham cracker crumbs, 1/4 cup of melted unsalted butter, and 2 tablespoons of sugar. Use a fork to combine them until the crumbs feel like wet sand. This mix will create a tasty base. Now, take a tablespoon of this crumb mix and press it into each muffin cup. Make sure it forms a nice layer. Bake this crust for 5 minutes, then take it out and let it cool.
Preparing the Cheesecake Mixture
For the cheesecake filling, take a large mixing bowl. Beat 2 packages of softened cream cheese with an electric mixer until it’s smooth. Slowly add in 1/2 cup of powdered sugar and 1 teaspoon of vanilla extract. Mix until it’s well combined. Now, add 2 eggs, one at a time. Keep the mixer on low speed. Mix just until blended; overmixing can ruin the texture.
Baking and Cooling the Mini Cheesecakes
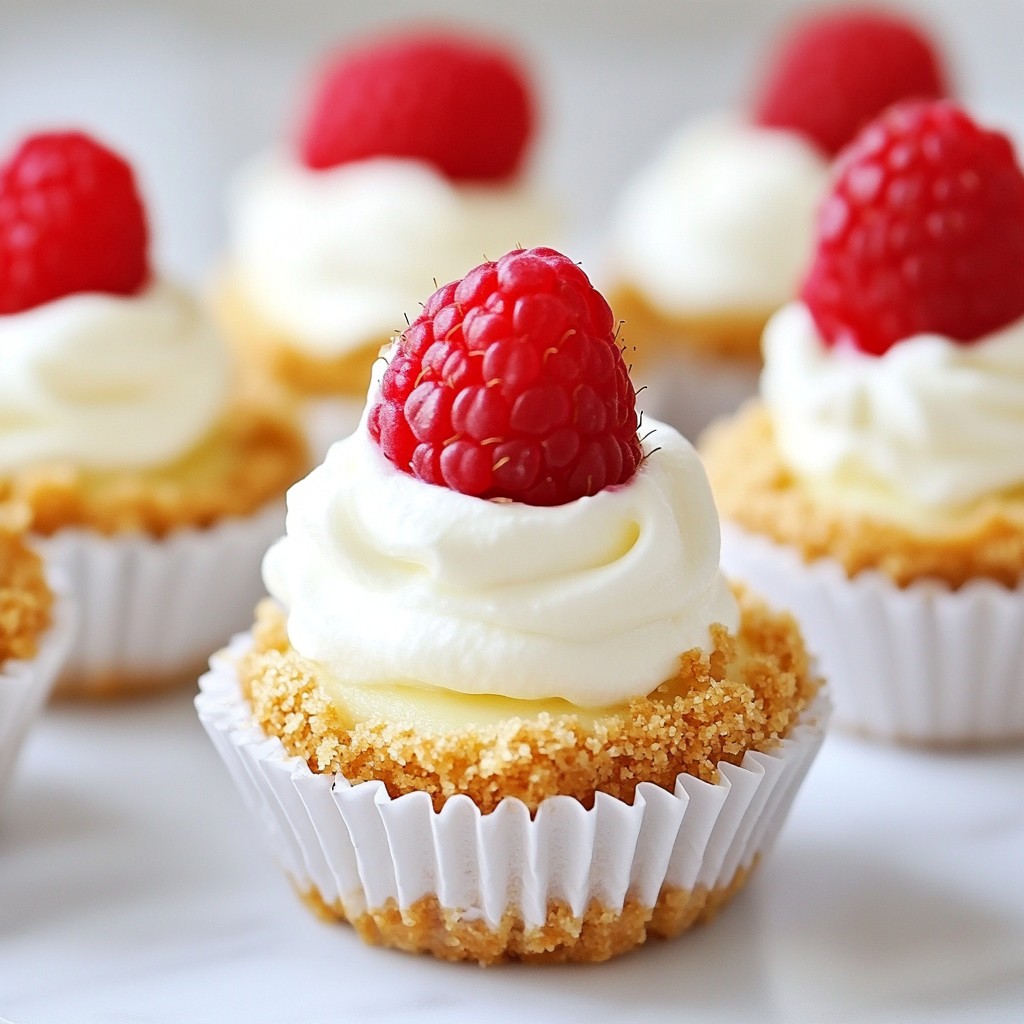
Next, spoon the cream cheese mixture over the cooled crusts. Fill each cup about 3/4 full. Place the muffin tin in the oven and bake for 15-18 minutes. You want the edges to set but the centers to jiggle a bit. After baking, let the bites cool in the pan for 10 minutes. Then, transfer them to a wire rack to cool completely. Refrigerate for at least 2 hours before serving. Before you enjoy, top with fresh raspberries and a bit of whipped cream if you like!
Tips & Tricks
How to Avoid Cracks in Cheesecakes
To keep your mini cheesecakes smooth, avoid overmixing the batter. When you add eggs, mix just until blended. Overmixing adds air, which can cause cracks. Also, bake at a lower temperature. A gentle bake helps create a creamy texture and reduces the chance of cracks.
Ensuring Even Baking
For even baking, make sure your oven is preheated. Use an oven thermometer to check the exact temperature. Position your muffin tin in the center of the oven. This placement helps heat circulate evenly. If you bake multiple trays, rotate them halfway through baking. This trick ensures all mini cheesecakes cook the same.
Serving Suggestions for Mini Cheesecake Bites
Mini cheesecake bites are great on their own, but you can dress them up. Top each bite with fresh raspberries for a burst of color and flavor. A dollop of whipped cream adds a nice touch, too. For a twist, try drizzling chocolate sauce or caramel over them. Serve on a fun platter for a party or gathering.
Pro Tips
- Use Room Temperature Ingredients: Ensure your cream cheese and eggs are at room temperature for a smoother batter and better incorporation.
- Don’t Overmix: Once you add the eggs, mix just until combined to avoid a dense texture in your cheesecake bites.
- Cool Gradually: Allow the cheesecake bites to cool in the pan before transferring to a wire rack to prevent cracks on the surface.
- Chill Before Serving: Refrigerate the cheesecake bites for at least 2 hours to enhance their flavor and achieve the perfect texture.
Variations
Flavor Variations (Chocolate, Pumpkin, etc.)
You can easily change the flavor of your mini cheesecake bites. To make chocolate cheesecake bites, add 1/2 cup of melted chocolate to the cream cheese mix. For pumpkin, mix in 1 cup of pumpkin puree and a dash of pumpkin spice. These flavors give a fun twist to the classic recipe. Feel free to get creative with flavors you love!
Alternative Crust Options (Oreo, Nut-based)
Switching the crust is simple and fun. You can use crushed Oreo cookies instead of graham crackers for a rich taste. Just mix crushed Oreos with melted butter, and press it into the muffin tin. If you want a nutty crust, try ground almonds or walnuts. Combine crushed nuts with a bit of butter and sugar for a tasty base. Each option adds a new layer of flavor to your cheesecake bites.
Fruit Toppings for Seasonal Options
Topping your mini cheesecakes with fruit makes them even better. Fresh raspberries are a great choice for a sweet touch. You can also use strawberries, blueberries, or sliced peaches, depending on the season. For a fun twist, try adding a drizzle of chocolate or a sprinkle of nuts on top. These toppings not only look nice but also add delicious flavors and textures.
Storage Info
Best Methods for Storing Mini Cheesecakes
To keep your mini cheesecake bites fresh, store them in an airtight container. Use a container that fits them snugly to avoid movement. Place a layer of parchment paper between layers if stacking. This will help keep the tops intact. You can also cover them with plastic wrap for extra protection.
How Long They Last in the Refrigerator
Mini cheesecake bites last up to five days in the fridge. Make sure your fridge is set to a cool temperature. Check for any signs of spoilage like changes in color or smell before eating. If you notice any, it’s best to throw them away.
Freezing Instructions and Tips
You can freeze mini cheesecake bites for longer storage. Place them in a single layer on a baking sheet first. Freeze them until solid, about an hour. Then, transfer them to a freezer-safe container or bag. They can last up to three months in the freezer. When you’re ready to eat them, thaw them overnight in the fridge. Avoid refreezing once thawed, as it can change their texture.
FAQs
What is the best way to serve mini cheesecake bites?
You can serve mini cheesecake bites in many fun ways. I like to place them on a nice platter. You can add fresh raspberries on top for a pop of color. A dollop of whipped cream also adds a nice touch. For a twist, try drizzling chocolate sauce over them. This makes them look fancy and taste even better!
Can I make these mini cheesecakes ahead of time?
Yes, you can make these mini cheesecakes ahead of time. They store well in the fridge for up to five days. Just cover them with plastic wrap to keep them fresh. If you want to make them even earlier, you can freeze them. They last up to three months in the freezer. Just thaw them in the fridge before serving.
How do I know when the cheesecake bites are done baking?
The cheesecake bites are done when the edges are set. The centers should still look a bit jiggly. This is normal, and they will firm up as they cool. Keep an eye on them after 15 minutes. You don't want to overbake and dry them out. Trust me, the perfect bake gives you that creamy texture we all love!
You now have a solid guide to making mini cheesecakes. We covered the ingredients, step-by-step instructions, tips for success, tasty variations, and storage information. By following these steps, you can avoid cracks and bake perfect bites every time. Don't forget to explore different flavors and toppings to find your favorite. Mini cheesecakes are simple, fun, and tasty. Try them at your next gathering, and enjoy every bite!