If you love a sweet and tangy dessert, you’re in luck! Key Lime Pie Bars are the perfect treat for warm days. They combine a crumbly graham cracker crust with a zesty, creamy filling. In this post, I’ll guide you through simple steps to create these delicious bars. We’ll explore the best ingredients, tips for baking, and fun variations. Get ready to impress your friends and family with this fresh and flavorful dessert!
Why I Love This Recipe
- Refreshing Flavor: The combination of key lime juice and zest brings a vibrant and refreshing taste that’s perfect for warm weather.
- Easy to Make: This recipe involves simple steps and common ingredients, making it accessible for bakers of all skill levels.
- Perfectly Sweet and Tart: The balance of sweetness from the condensed milk and tartness from the limes creates a delightful flavor profile.
- Great for Sharing: These bars are easy to cut into squares, making them ideal for parties, picnics, or gatherings.
Ingredients
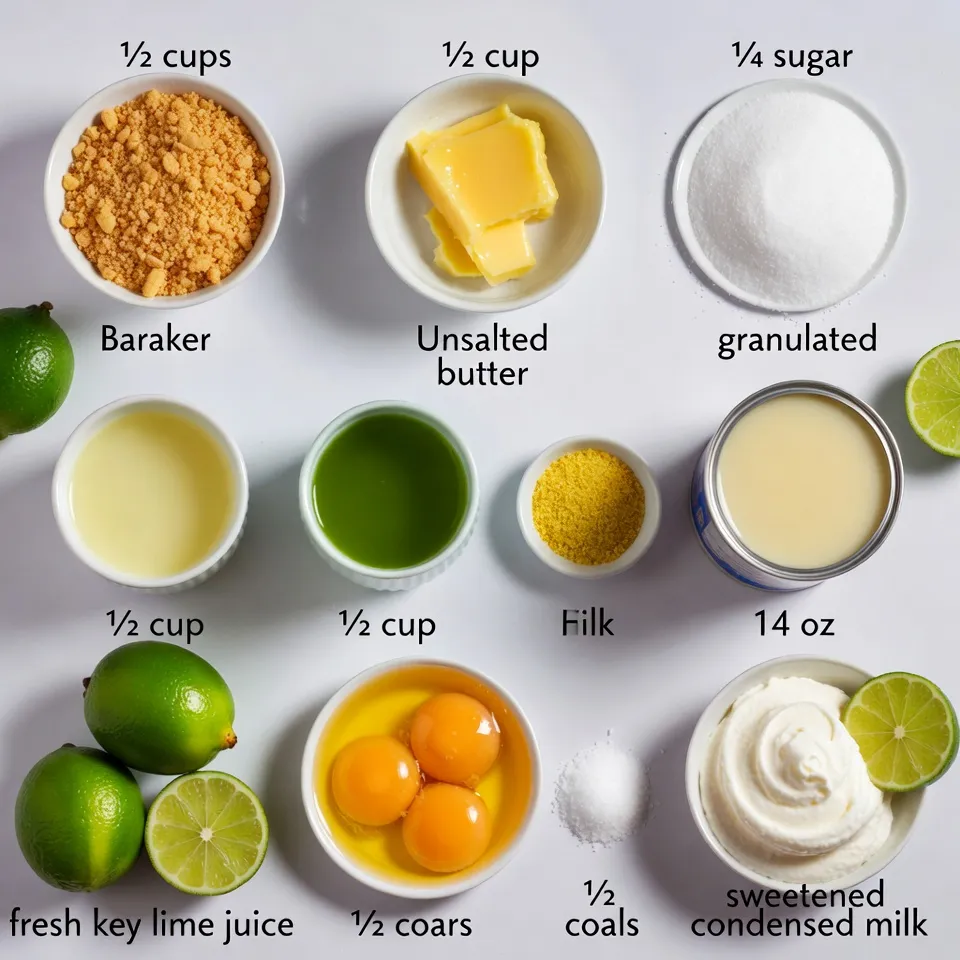
List of Ingredients
– 1 ½ cups graham cracker crumbs
– ½ cup unsalted butter, melted
– ¼ cup granulated sugar
– 1 (14 oz) can sweetened condensed milk
– ½ cup fresh key lime juice
– 3 large egg yolks
– 1 tablespoon lime zest
– ½ teaspoon salt
– Whipped cream for topping
– Lime slices for garnish
Key lime pie bars need simple, fresh ingredients. Each one plays a big role. The graham cracker crumbs give a nice crunch. They mix with melted butter and sugar to make the crust. The sweetness in the filling comes from sweetened condensed milk. Fresh key lime juice adds a zesty kick.
Three egg yolks thicken the filling. Lime zest brings even more flavor. A pinch of salt balances the sweetness. Finally, whipped cream and lime slices make for a perfect topping.
Using fresh key limes makes a real difference. They taste bright and tangy. You can find them in stores or farmers’ markets. Don’t skip the lime zest! It adds a burst of flavor.
With these ingredients ready, you’re set for a delicious treat. Enjoy the bright flavors of summer in every bite!
Step-by-Step Instructions
Prepping the Crust
1. Preheat your oven to 350°F (175°C). This helps the crust cook evenly.
2. In a mixing bowl, combine the graham cracker crumbs, melted butter, and sugar. Mix until all the crumbs are moist.
3. Press the mixture firmly into the bottom of a greased 8×8-inch baking dish. Make sure it is even and compact.
4. Bake for 10 minutes. You want the crust to turn a light golden color. Remove it from the oven and let it cool.
Preparing the Filling
1. In a separate bowl, whisk together the sweetened condensed milk, fresh key lime juice, egg yolks, lime zest, and salt. Mix until the filling is smooth.
2. Using fresh key lime juice is key. It gives a bright taste that bottled juice can’t match. Squeeze about 15-20 limes to get half a cup of juice.
Combining and Baking
1. Pour the lime mixture over the cooled crust. Spread it evenly to cover the crust.
2. Bake in the oven for 15-20 minutes. The filling should be set but still a bit jiggly in the center.
3. Let the bars cool for 30 minutes at room temperature. Then, refrigerate them for at least 2 hours. This helps the bars firm up nicely.
Tips & Tricks
Achieving the Perfect Texture
To get the best texture for your Key Lime Pie Bars, pay close attention to the baking time. Overbaking the lime filling can lead to a dry texture. You want it to be just set in the center, with a little jiggle. This provides that creamy feel we all love.
The crust is also important. Ensure it holds well by pressing the graham cracker mixture firmly into the baking dish. Bake it until it turns a light golden brown. This step gives your crust a strong foundation for the tart filling.
Flavor Enhancements
Adding extra zest can elevate the flavor of your bars. Consider using orange or lemon zest along with the lime. This adds a layer of complexity. You can also try adding a splash of vanilla extract for warmth.
Using fresh ingredients maximizes the lime flavor. Fresh key limes provide a bright and bold taste. They are worth the extra effort. You’ll notice the difference in every bite.
Serving Suggestions
Serve your Key Lime Pie Bars chilled for the best flavor. A dollop of whipped cream on top adds creaminess. Garnish with a slice of lime for a pop of color.
Pair these bars with a refreshing iced tea or a light white wine. The acidity of the lime balances well with these drinks. This makes for a perfect summer treat.
Pro Tips
- Use Fresh Limes: For the best flavor, always use fresh key limes instead of bottled juice. The freshness makes a significant difference in taste!
- Cool Before Cutting: Allow the bars to cool completely at room temperature before refrigerating. This helps them set properly and makes cutting easier.
- Customize Your Topping: Feel free to get creative with your toppings! Try adding toasted coconut, lime zest, or even a sprinkle of sea salt for an extra flavor kick.
- Perfect Serving Size: For neat squares, use a sharp knife and wipe it clean between cuts. This will give you clean edges and a more professional appearance.
Variations
Alternative Crust Ideas
You can easily switch up the crust for your Key Lime Pie Bars. If you need a gluten-free option, use gluten-free graham crackers. They work just as well and taste great. You can also add nuts or shredded coconut to the crust mix. This adds a nice crunch and extra flavor.
Different Fillings
Don’t be afraid to get creative with the filling. Try making coconut key lime pie bars. Just add some coconut cream to the mix for a tropical twist. Another fun option is strawberry key lime pie bars. Blend in some fresh strawberries for a sweet and tart taste that everyone will love.
Dietary Adjustments
Want to make your bars vegan? Swap the sweetened condensed milk for coconut milk and use flax eggs. This keeps the creamy texture while being plant-based. For those on a low-sugar or keto diet, use a sugar substitute in the filling. Just make sure it’s safe for baking. These adjustments let everyone enjoy this treat!
Storage Info
Best Practices for Storage
To keep your Key Lime Pie Bars fresh, store them in an airtight container. Place a sheet of parchment paper between the bars and the lid to avoid sticking. Refrigerate the container right away. You can also freeze these bars for longer storage. Wrap each bar in plastic wrap, then put them in a freezer-safe bag. This method keeps them fresh for up to three months.
Shelf Life
In the fridge, these bars stay fresh for about five days. Check for any signs of spoilage, like a sour smell or discoloration. If the bars feel slimy or have an odd taste, it’s best to toss them. Always trust your senses when it comes to food safety.
Reheating and Serving Later
If you want to reheat your bars, do it gently. Preheat your oven to 300°F (150°C). Place the bars on a baking sheet and warm them for about ten minutes. This helps keep their texture and flavor intact. Enjoy them cold or warm, but always top with fresh whipped cream and a lime slice for the best taste!
FAQs
What makes key limes different from regular limes?
Key limes are smaller and have a thinner skin than regular limes. They pack a unique flavor that is more tart and aromatic. This gives key lime pie bars their signature taste. The juice from key limes is more fragrant and has a distinct sweetness. You really can taste the difference in your dessert!
Can I use bottled key lime juice?
Yes, you can use bottled key lime juice. It is convenient and saves time. However, it may lack the fresh flavor of real key limes. Fresh juice gives a brighter taste to your bars. If you want the best flavor, squeeze fresh key limes. The effort is worth it for a great key lime pie bar!
How do I know when the bars are done baking?
Watch for signs to know when your bars are ready. The filling should be set but still slightly jiggly in the center. If it looks too firm, they may be overbaked. You want a soft, creamy texture. Let them cool and chill for a while. When it’s time to cut, they should hold their shape. Enjoy the perfect treat!
Key Lime Pie Bars are delicious and fun to make. We explored key ingredients, from graham cracker crumbs to fresh key limes. I shared tips for the perfect crust and filling. You can also try fun variations to match your taste. Lastly, I covered storage and serving ideas to keep your bars fresh. Enjoy making these treats with friends and family. Savor the tangy flavor and share your tasty results. Your next dessert will impress everyon